- Difficulty
- Beginner
- ● ● ○ ○ ○
- Time
- 25–35 min
- From blank page
- Steps
- 9
- Teardrop → ocean blue
- Best for
- Ages 6+
- Kids & adults
Grab these first
A pencil (HB or 2B), an eraser, plain paper, and colored pencils — steel blue, a deeper navy, cream, soft pink, and black. A black fineliner is optional for the clean outline in step 5, but graphite alone is plenty.
Want a perfectly proportioned shark on the first try? Open the shark template in ARTrace and project it onto your paper through the AR camera. Your hand does the drawing; your phone holds the shape in place — a modern camera lucida in your pocket. More to trace once you finish? Browse the full drawings-to-trace library for ideas.
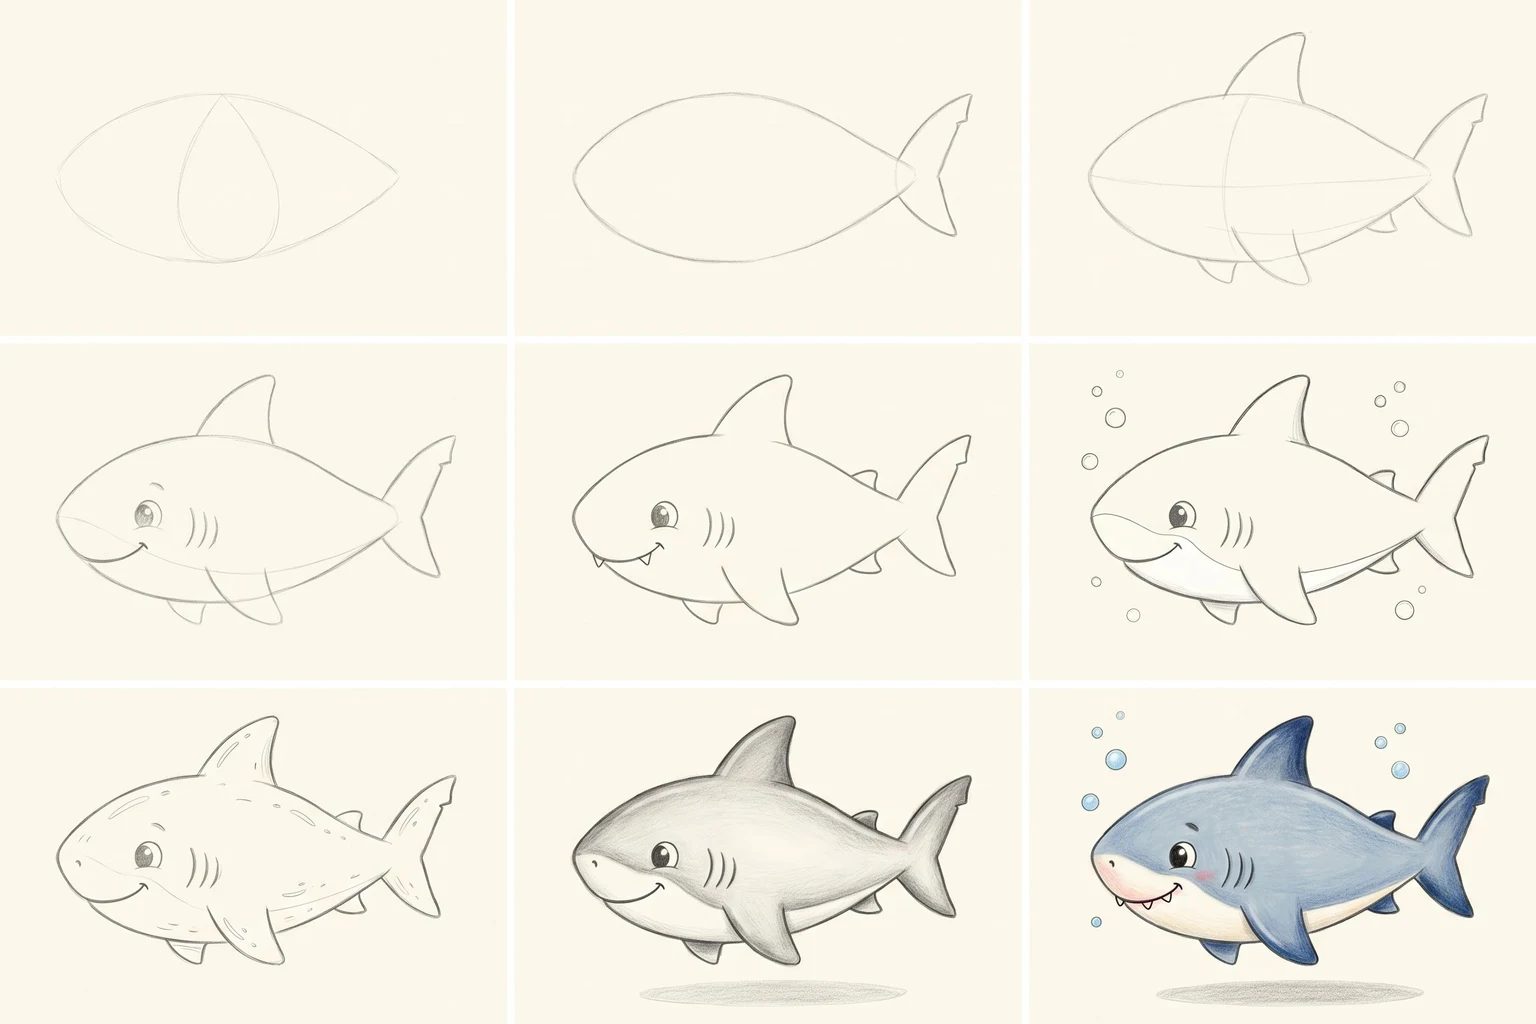
1. Teardrop body
Start with a faint sideways teardrop in the center of your page — the wide end on the left for the head, tapering smoothly to the right for the tail base. Picture a soft lemon or a stretched egg lying on its side; that's exactly the silhouette you want.
Keep the pencil light. This is the load-bearing shape for everything that follows, so it needs to be clean — but it also needs to be faint, because half of this line will be inside the body once you're done and you'll want to erase the rest.
2. Triangular tail
On the right end of the teardrop, draw a small tail fin shaped like a crescent moon or a soft, swept-back V. Make the upper lobe slightly longer than the lower — that subtle asymmetry is what makes a shark tail read as a shark tail and not a generic fish tail.
The tail attaches to the body at a slight narrowing, like a wrist — not flush against the body, not floating away from it.
3. Dorsal and pectoral fin
A tall upright dorsal fin curves up from the middle of the back — think of it as a small triangle with the trailing edge slightly swept back, not a perfect isoceles. A smaller pectoral fin reaches down and forward from under the belly, like a wing. With these two fins added, the silhouette is now unmistakably a shark.
4. Eye, mouth, gills — instant shark
A single big round eye sits about a third of the way back from the front of the head. Underneath it, a wide curving smile stretches along the lower jaw — gently arched, not flat. Three short parallel gill slits sit just behind the eye, angled slightly back.
These three features together — eye, mouth, gills — are what flip the drawing from "fish-shaped blob" to "this is clearly a shark."
5. Two tiny teeth — and a clean outline
Two small pointed teeth peek down from the upper lip. Keep them tiny — full rows of jagged teeth tip the drawing into "scary jaws" territory; two little fangs keep it firmly in "friendly cartoon" territory.
Now trace the whole silhouette with one confident line and erase every construction stroke underneath. The drawing finally tightens up here.
6. White belly and bubbles
A soft curved line along the lower half of the body marks the lighter belly patch where the cream-white color will live later. Then sprinkle 4–6 small round bubbles drifting up from around the head and tail — different sizes, never lined up in a row. These bubbles do all the heavy lifting for the underwater feel without you having to actually draw the water.
7. Smooth skin texture
Short, light pencil strokes along the back hint at smooth shark skin — barely there, following the curve of the body. A few tiny U-curves on the belly suggest subtle highlights. Keep it minimal — sharks are sleek, not fuzzy, so any heavy hatching here would fight the silhouette instead of supporting it.
8. Shadows do the heavy lifting
Soft graphite shading along the upper back, under the belly, underneath the dorsal fin and along the tail. Then the single most important touch: a small oval shadow underneath the shark — not on the ground, but in the "water" below. That single oval is what makes the shark feel like it's swimming through space instead of floating in a vacuum.
9. Ocean-blue color — the final flourish
Soft steel-blue across the back fading to creamy white on the belly. Deeper navy along the spine and at the tips of the fins — that two-tone blue is what gives the shark depth instead of looking like a flat sticker. Tiny pink mouth interior, white teeth, glossy black eye. Light blue water bubbles. Deepen the existing graphite shadows a touch and sign your name in the corner.