- Difficulty
- Beginner
- ● ● ○ ○ ○
- Time
- 25–35 min
- From blank page
- Steps
- 9
- Circle → warm color
- Best for
- Ages 6+
- Kids & adults
Grab these first
A pencil (HB or 2B), an eraser, plain paper, and colored pencils — orange, brown, cream, a hint of pink, and soft green for the eyes. A black fineliner is optional for the clean outline in step 5, but graphite alone is plenty.
Want a perfectly proportioned cat on the first try? Open the cat template in ARTrace and project it onto your paper through the AR camera. Your hand does the drawing; your phone holds the shape in place — a modern camera lucida in your pocket. More to trace once you finish? Browse the full drawings-to-trace library for ideas.
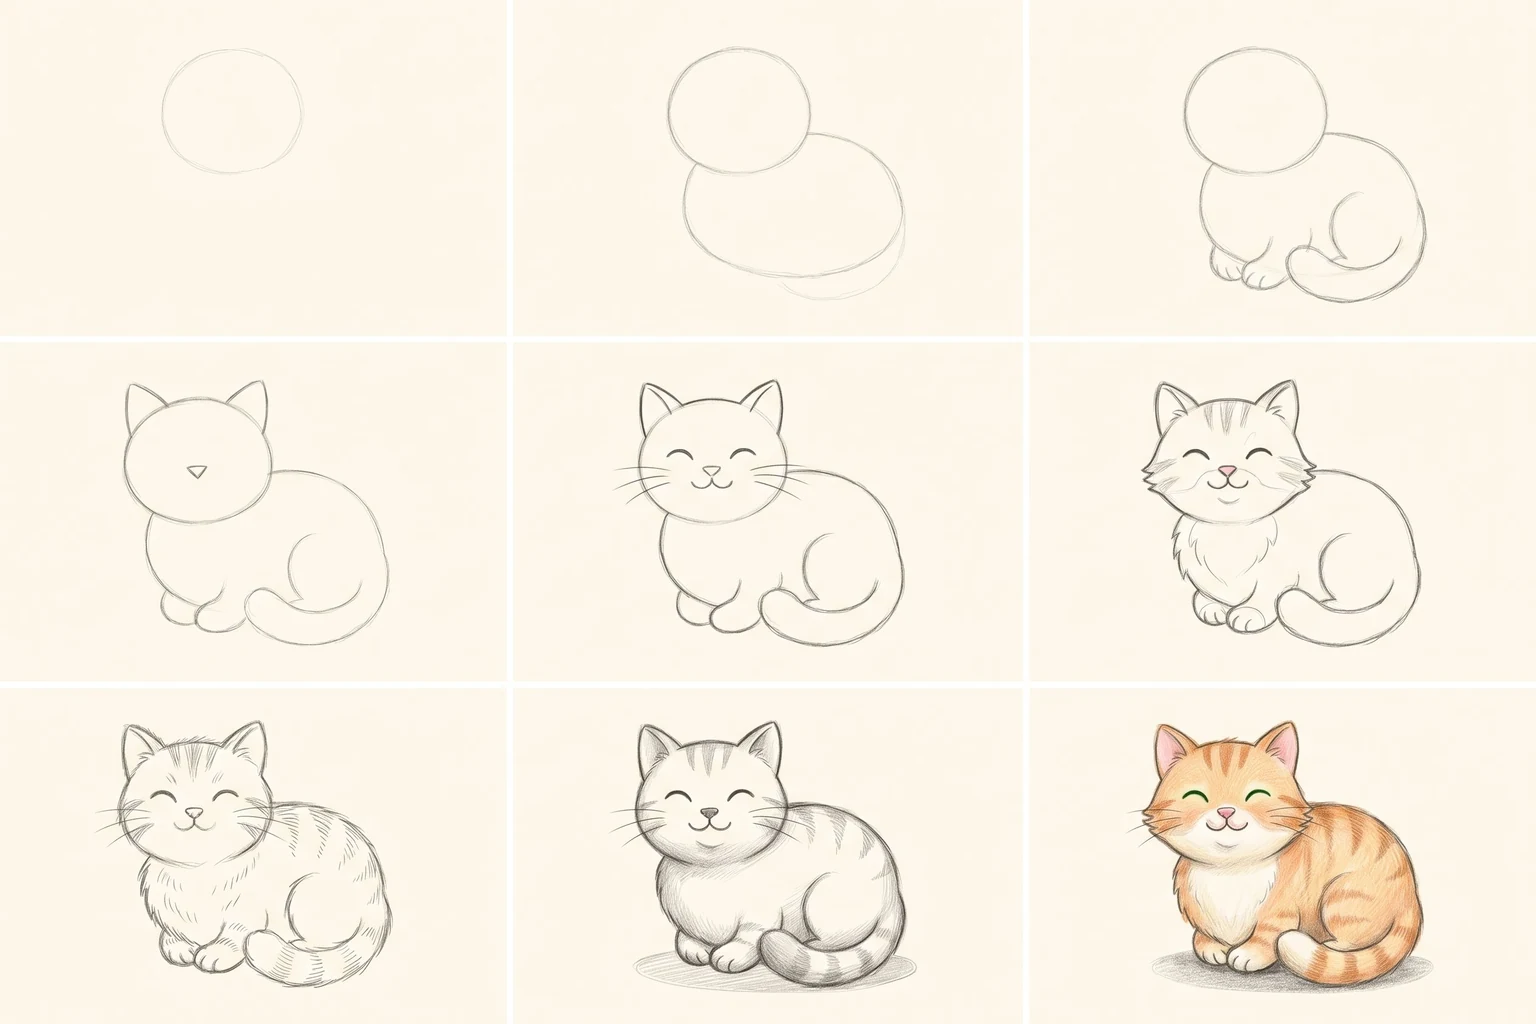
1. Round head circle
Draw one circle in the upper-left third of your page. That's the head. Keep the pencil loose and the line genuinely faint — this is construction and you'll erase most of it. A slightly squashed, not-quite-perfect circle reads more naturally than a clean compass circle, so don't fight your hand on this one.
The head sits high in the cell on purpose: the body and the tucked paws will stretch wider than tall below it. Leave yourself room to grow downward and out.
2. Oval loaf body
Right under and overlapping the head by a small amount, draw a wider horizontal oval. This is the body. Loaf cats — the universal sitting-cat silhouette — are basically a head perched on a soft sleeping baguette. Keep the body wider than tall and gently rounded; if it looks like an oval pillow, you're nailing it.
3. Tail and tucked paws
Curl a long graceful tail forward from the back of the body so it almost reaches the chin. Then two tiny round paws peek out from the front of the loaf. Everything stays compact and tucked — this is the universal "I am loafing here, please do not move me" pose.
4. Triangle ears and nose — instant cat
Two clean triangle ears pop up from the top of the head. A small triangle nose sits low on the face, roughly at the vertical center. That's it — cats are mostly geometry until the very end. The moment those three triangles appear, the smooth blob officially becomes a cat.
5. Bring the face to life — and commit to a clean line
Add two closed-curve eyes (a smiling cat is the easiest cat to draw), a small mouth tucked under the nose, and three or four delicate whisker lines on each side. Then trace your whole cat with one confident line and erase every construction stroke underneath. This is where the drawing finally tightens up.
6. Cheek tufts and chest patch
Add fluffy cheek tufts on either side of the face — short outward strokes that sit just below and outside the eyes. Then a soft chest patch where the front of the body meets the paws. These two small additions turn a smooth cartoon shape into a recognizable fluffy domestic cat.
7. Hint at the fur
Short, directional pencil strokes around the edges of the body and along the back — follow the direction the fur grows: down the sides, curving around the belly, tapering toward the back leg. A few separation lines on each paw to suggest toes. A couple of texture marks along the tail. Less is more here — you're suggesting fur, not drawing every hair.
8. Shadows do the heavy lifting
Soft graphite shading under the chin, along the belly, behind the back leg, and under the curled tail. Then the single most important touch: a clear oval shadow on the ground beneath the cat. It stops floating. It starts sitting.
9. Warm tabby color — the final flourish
Warm orange tabby across the back, blending lighter onto the belly and muzzle. A few slightly darker stripes along the back and tail. Soft pink nose and inner ears. Gentle green eyes — keep them tiny so the smiling expression holds. Deepen the existing shadows a touch and sign your name.