- Difficulty
- Beginner
- ● ● ○ ○ ○
- Time
- 35–45 min
- From blank page
- Steps
- 9
- Circle → full color
- Best for
- Ages 6+
- Kids & adults
Grab these first
A pencil (HB or 2B), an eraser, plain paper, and colored pencils — warm tawny gold, a deeper amber, a rich dark brown, and a touch of soft pink. A black fineliner is nice for the clean outline in step 5, but graphite alone works just fine.
Want a perfectly proportioned lion on the first try? Open the lion template in ARTrace and project it onto your paper through the AR camera. Your hand does the drawing; your phone holds the shape in place — a modern camera lucida in your pocket. More to trace once you finish? Browse the full drawings-to-trace library for ideas.
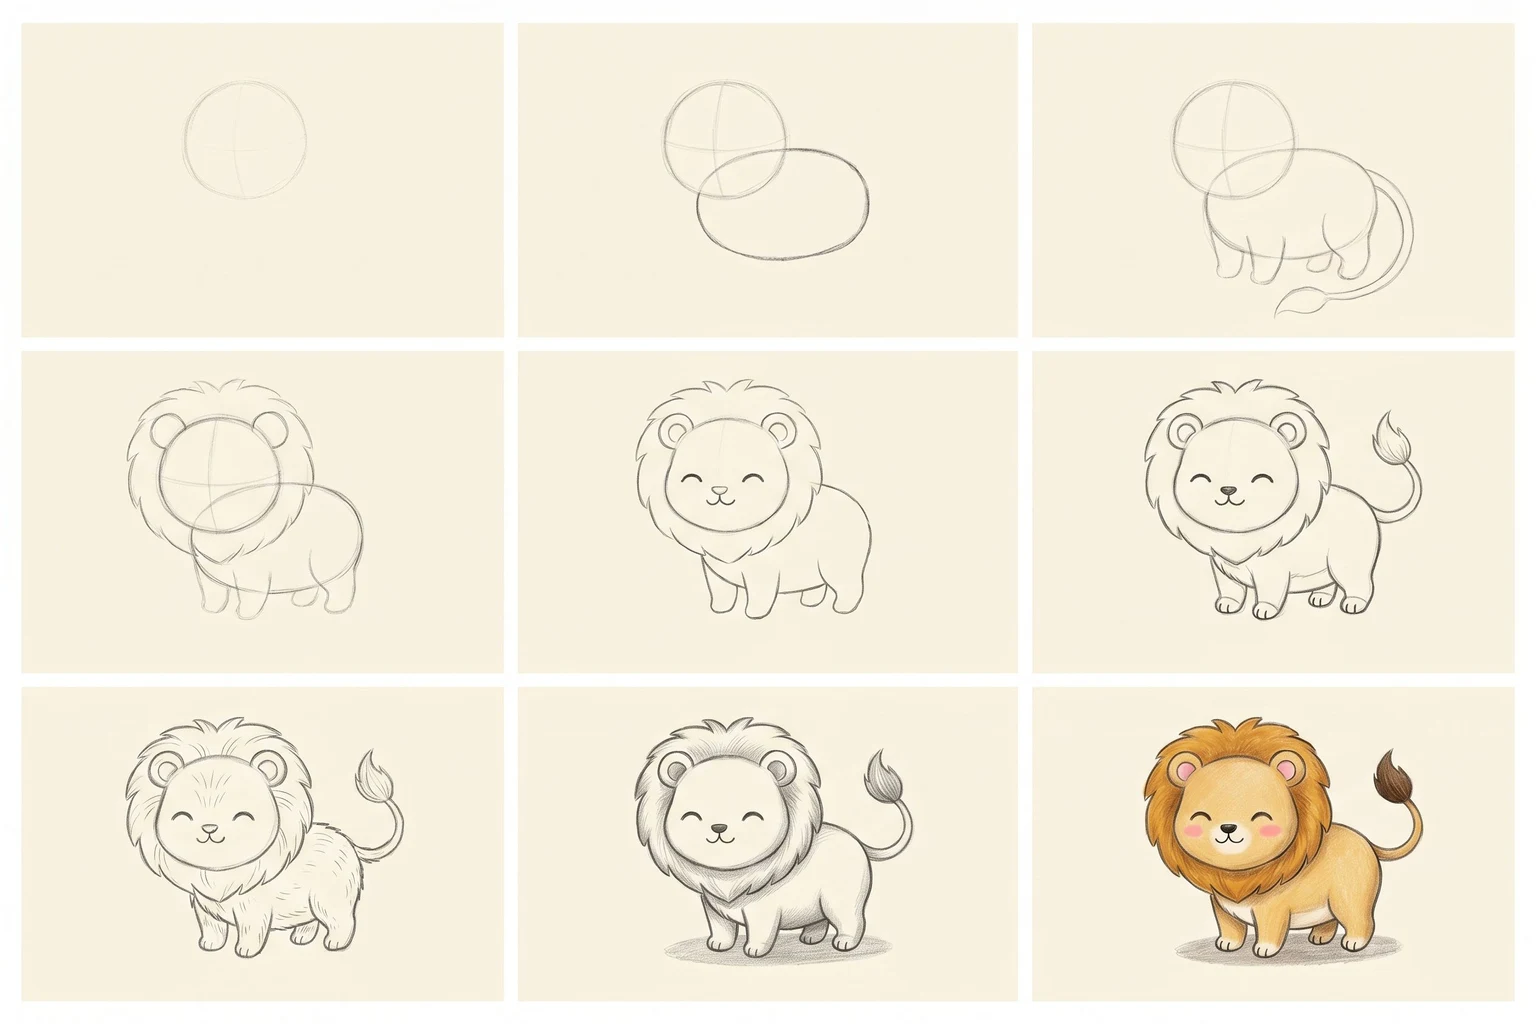
1. Light head circle
Draw one faint circle in the upper third of your page. That's the head. Press lightly — this is pure construction and you'll erase most of it later. Add a barely-visible cross inside the circle: a vertical line for the center of the face, a horizontal line for the eye level. Those two crossing lines do all the placement work for you in step 5.
Don't worry about a perfect round shape. A slightly egg-shaped or wobbly circle gives the lion character.
2. Chunky body alongside
Right next to the head, slightly lower and to the right, sketch a wide horizontal oval. That's the body. Overlap the head circle just a touch at the neck so they read as one creature, not two floating shapes. Cartoon lions are stocky little things — make the body noticeably bigger than the head, otherwise the silhouette ends up looking like a kitten in fancy hair.
3. Tucked legs and curling tail
Two short stubby legs poke out from under the body — really short, just enough to read as legs. Then sweep a long curling tail out behind the body, ending in a tiny pointed shape where the tuft will sit. The tail is half the personality of the drawing, so let it curl back on itself rather than trailing straight.
4. The mane that makes the lion
Sketch a fluffy round wreath all the way around the head, slightly wider than the head circle on every side. Make the outline gently wavy — a soft cloud shape, not a perfect ring. Two tiny rounded ears peek up through the mane at the top. The moment that wreath goes on, the rounded blob becomes unmistakably a lion.
5. Bring the face to life
Two closed-curve happy eyes sit right on the construction crossbar, a tiny triangular nose at the center, and a small smile just underneath. Lions in this style always look like they're enjoying a sunbeam. Now trace the whole drawing with one confident line and erase every single construction stroke. This is the moment the lion tightens up and stops looking like a sketch.
6. Tufted tail and paw details
That pointed shape at the tip of the tail becomes a small fluffy tuft — think of a tiny paintbrush. A few short curved strokes around it sell the fluff. Then add two or three short separation lines on each paw to suggest toes, and a tiny line where each front leg meets the body. Small details, but they're what stop the lion from looking like a stuffed potato.
7. Hint at fluffy mane texture
Short directional pencil strokes around the outside edge of the mane, all flowing outward like rays from the head. A few softer strokes inside the mane suggest depth. Then a couple of light strokes across the body for warmth and along the tail to match. Keep these light — they're hints, not decoration, and you want them to hold up under the colored pencil layer that comes next.
8. Shadows do the heavy lifting
Soft graphite shading under the chin, along one side of the belly, between the legs, and along one side of the mane (pick the opposite side from your imagined light source). Then the single most important touch: a small oval shadow on the ground beneath the paws. It stops the lion from floating. It starts him sitting.
9. Warm tawny color — the final flourish
Warm tawny gold across the body and face, deepening just slightly along the belly and the underside of the chin. Deep amber for the mane, with a darker amber along the outer edge and where the mane meets the face. Dark brown on the tail tuft and the small paw pads. Soft pink inside the ears and a hint on the cheeks. A tiny black nose. Deepen the existing shadows a touch and sign your name.